Showing posts with label Tutorials. Show all posts

Monday, December 10, 2012

DIY Snow Globes

Oh how I love snow globes!! And mason jars!! And combining the two is pretty much the best idea ever.  These little guys are sold for astronomical prices at Anthropologie:


FORTY DOLLARS EACH?! ARE YOU INSANE?!?!

I came across some DIY replicas over at Whipperberry and decided to give them a whirl.  They took all of five minutes to put together.

Supplies:
Trees
Jars
Glue dots or glue gun
Buffalo Snow


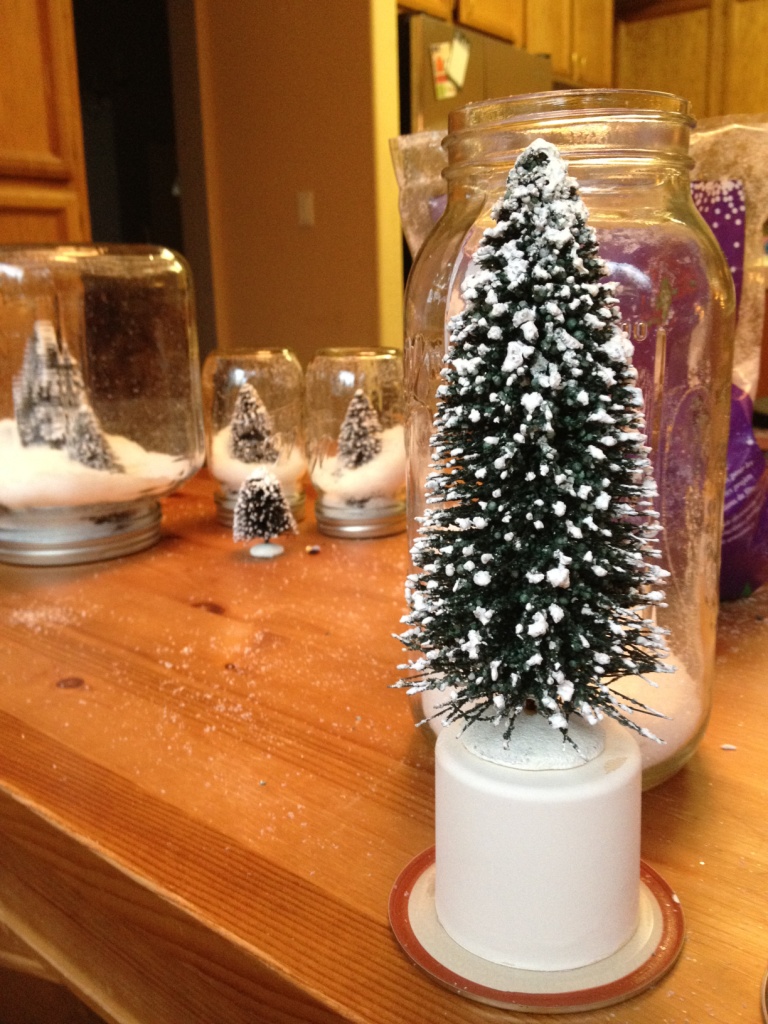
I found the trees and most of the jars at garage sales.  The buffalo snow and the tall mason jar I picked up at Michael's.  I needed one more teeny tiny jar so my friend Lindsey found one for me :)

I had some glue dots on hand to secure the trees to the lids. These rock, especially if you don't want to bust out the glue gun. 

 
I like a lot of snow so I filled 'em on up.


I needed some of the trees to be taller so I glued them on various caps, this one is from a cooking spray:


My out of pocket price was about six dollars total and I'm pretty darn pleased with the way they turned out!!


Pin It
Happy Holidays!

Friday, November 9, 2012

No Mess Finger Painting

My toddler loooooves to finger paint. 

Case in point:


The kind we use is super easy to wash off ANYTHING, but they still make a heck of a mess!  With the rainy season around the corner I decided to try a mess free finger painting option that I pinned from The Hippie Housewife.

Here are all the supplies you need:


First introduction lasted all of five minutes.


Sometimes old fashioned finger painting only lasts for 5 minutes too so the onvenience of leaving this mess free painting option up for a couple days made it an instant winner.  He kept coming back with renewed interest every couple hours or so.

Saving this for upcoming rainy days!

Friday, September 14, 2012

How to Paint an Elephant (or what have you)

So this is old school painting and I'm pretty sure people were using this technique before I was even born.  It's definitely nothing new under the sun but when I posted a pic on Instagram, I received some how-to questions.

Here is how you paint an elephant with no artistic ability whatsoever.

All you need to do is rummage up an old bulky overhead projector (thanks Dad!)


Tape off the wall using your projection


Add Paint


Peel off the tape (preferably while the paint is still wet)


And boom.  Instant elephant.

Doesn't get much easier than that!  Stay tuned for a full reveal of Landon's safari animal room in about a month or so when we can afford baseboards :)
Pin It

Friday, August 3, 2012

DIY Glazed Frames

My mom brought some boxes of old stuff for me to go through and try to sell back when we had our garage sale. I uncovered these pictures frames she used to have hanging in our house when I was growing up and I found myself getting nostalgic.  I put them aside and decided to re purpose them. 


When I finally got around to it, I first gave them a good scrub down and primed them with Kilz spray primer.  (oops forgot a picture of this step)  Then I spray painted them with Krylon's Ocean Breeze.  It was a night and day transformation but I wanted to add some sort of distressed look.


So I glazed them with Valspar Black Glaze, using the technique from All Things Thrifty. The old wood and the grooves were PERFECT for soaking in the glaze.  This is only my second attempt at glazing something and I am so pleased with the turnout (to see the first glazing attempt click HERE).
 

I filled the frames with some of Landon's newborn pictures, which were taken by the very talented Christina Harrison

I bought a wooden "B" at Michael's for $1 and painted it gray. 

The mirror is my high school sweetheart. I found her when a neighbor was having a garage sale.  She is legit, super old, weighs like 10 pounds and it was love at first sight. The neighbor gave her to me for free and I have been hauling her around to various homes since my college days.


And so my wall is complete!  I don't think I will toss out old frames ever again :)

Pin It
Linking to: I Heart Nap Time, Snips & Spice, Nifty Thrifty Things, Not Just a Housewife, Kammy's Korner, The DIY Showoff, The Tidy Mom, The 36th Avenue, Tatertots & Jello, A Diamond in the Stuff, Whipperberry, A Lived In Home

Saturday, July 21, 2012

DIY Chalkboard Frames

Once upon a time I had a fruitful trip to Goodwill.  Here is a refresher:


See those God-awful, ugly green frames on top?  These ones?


Well, I got two of them for a dollar each!  I spray painted the frames gray and sprayed the glass with chalkboard paint.


Then added some simple flowers made from hot glue and crepe paper:


Due to these little flowers I'm pretty sure I will no longer have a fingerprint on my right ring finger.  The glue gun exploded all over it.  Normally I would have rushed straight away to the sink but we were in the garage and Landon was in his swing.  In hindsight I probably should have just ran inside and soaked my finger, hitting the garage door on the way in but in my panic I wrestled a not so happy toddler out of his swing and into the house and those few precious moments caused my finger to blister, badly.  So that's my glue gun war story.  At least the final product turned out well:


Pin It

Linking to:  DIY Show Off, Not Just a Housewife,  A Diamond in the Stuff, Kammy's Korner, The 36th Avenue, The Tidy Mom, Whipperberry, I Heart Naptime, Tatertots & Jello, The Shabby Nest,  Nifty Thrifty Things, Snips and Spice

Tuesday, July 17, 2012

DIY Cloud Dough

This week we made some cloud dough, also known as moon sand, which is super expensive to buy but lucky for us there is a cheap way to make it!  Just 8 cups of flour and 1 cup of baby oil:


We had yet to put any "sand" in our water/sand table...how cute is this?!


The Wombat had SO much fun with the cloud dough and it held his attention span for over an hour, which is saying a lot for my easily distracted 16 month old.  He played with the measuring cups, he transferred the sand from the table to the bowl, he threw it EVERYWHERE, he put it down the water slide, he drove his truck through it....really, the possibilities were endless.


I didn't put any water in the table the second day and it was just as much fun for Landon and much less mess to clean up :)  It probably would have kept for a while longer but our quantity was drastically diminishing, especially once L discovered he could mold the dough into balls that would break into a bazillion pieces once thrown.

I will officially be buying our flour in bulk at Costco now!

Manic Mother

Thursday, July 12, 2012

Upcycled Bottles

While browsing Pinterest, I came across some super cute painted vases and knew it was a Pin I was going to put to good use!  Instead of vases, I just used recycled bottles. 
After struggling with the first bottle to remove the stickiness from the label, I realized it was going to be harder than I thought.  I whined asked my husband nicely to lend me a hand and he soaked them in a solution of water and Simple Green.  After about an hour of soaking it came right off! Yay!


So then I headed to Home Depot to pick up some Oops Paint and I found some Behr paint samples for .50 each.  Score!


I also got some Valspar paint for a dollar and set to work, pouring the paint in the bottles and slowly turning until it was completely covered.  Then I dumped the paint out and had some lovely vases!

However, the next day the Valspar painted vases looked like this: 


Bummer.  I tried to salvage them but they were beyond repair and causing more headache than they were worth so they wound up being tossed out.  Instead, I used the Valspar paint on mason jars and they turned out great!  Not sure if it was the texture of the bottle or the lack of air needed to dry or...who knows?


Will definitely be using the technique more to pretty up some vases :)
Pin It


Linking to:  The DIY Showoff, Kammy's Korner, A Diamond in the Stuff, Not Just A Housewife, The 36th Avenue, One Artsy Mama, Whipperberry, I Heart Naptime

Wednesday, July 11, 2012

DIY Cup Cake Toppers

Why in the world are cup cake toppers so expensive?  It's only paper glued on to a toothpick!  So here is how you can make your own:


Toothpicks
Glue
Scrapbook paper
A Paper Punch (you don't need one but it certainly makes things easier!)


Easy Peasy!!

Friday, July 6, 2012

Cake Stand

I have been in major craft mode preparing for my sister-in-law's bridal shower (yay, another wedding for Landon to shower off his ring bearing skills)!!

So when Ben's grandma dropped off some stuff for our garage sale I found this little candle pillar in one of the boxes.  I put it aside it in hopes of creating some more cake stands


I eventually spray painted it gray and hot glued a purple plate on it.  Well, actually it's a purple charger....which according to the warning label technically you aren't supposed to use for food but I'm planning on either placing the lined cupcakes on it or using it for favors so no biggie :)

Pin It

Thursday, April 26, 2012

Diaper Cake: Lost & Found

Do you ever lose pictures only to find them MONTHS later in the most random files?  Well, I do.  It's why I hardly ever delete anything off my camera.  These photos have been missing since September!!! And they have been recently uncovered in the file "Raymond Lake 2011."  Really, I don't know how it happens. 

So hooray for lost and FOUND!  And here is a tutorial for a diaper cake that I made for my dear friend Lindsey.


Here are my supplies for this particular cake:
For the Base:
  • Cardboard
  • Wrapping Paper
  • Tape
For the Cake:
  • Roughly 30 diapers (so hang on to those ones your kiddos grow out of!)
  • Rubber bands
  • Ribbon
  • Flowers/Toys/Decorations of your choosing
  • Bottle (I just used a plastic water bottle)
  • Push Pins (or hot glue works too)
For the base,  cut a circle out of some cardboard (I used one of my many MANY Amazon boxes) and cover it with wrapping paper of your choosing.

For the cake, start by rolling up your diapers and rubber banding them.  Once you have them all made you can start playing around with your layers. 

The ratio I used for this cake:
  • Base Layer  - 20 Diapers
  • Middle Layer - 7 Diapers
  • Top Layer - 3 Diapers.
Replace (or cover) your rubber bands with ribbons on the outer layer diapers.

I garnished the cake with some fake flowers to go with the colors of the shower, but I've also used small baby toys, rattles, pacifiers, etc. 

And now you have a gift and a decoration all rolled (literally) into one!!

Monday, March 19, 2012

DIY Garland

I just love garland.  It gives any event a little extra flare.  A while ago I pinned a homemade Pom Pom Garland that was just to die for and I knew I had to try it.

Now that I have a curious little toddler who likes to climb things and eat bugs, I love finding easy to put down and pick back up again projects.  This craft was definitely a winner and will be making more appearances in parties to come...


I wasn't too worried about the quality of the yarn, so I just picked out some cheapo stuff at Walmart.  Start by wrapping your yarn around a wooden serving fork (any will do).  Take a small separate piece of yarn and tie tight knot around your creation.  Then simply slip the whole thing off the fork and cut the loops to make your pom pom!


For the next step, use a needle and yarn to string your poms together.  I tacked mine to the wall and then made some simple flowers out of napkins.


I'm so happy with the way the garland turned out....just wish I had taken some better pictures!!

Pin It